Put That In Your Bird and Roast It: Wine Can Chicken

wine can chicken roast whole chicken thyme

Garlic and Thyme Infused. Perfectly Wine-ily Moist

As summer approaches, we, in our small, no outdoor space, apartments know we are about to suffer through endless Facebook and Instagram and WordPress/Tumblr/Blogger posts of suburbanites grilling everything from lobster to steaks to chicken to vegetables.

Just the way it is. Men off of the island will be boasting about giant meats grilled to perfection. Women will be mastering marinades. Even the vegans will get involved with newly purchased vegetable griller trays.

OK, we admit it, we’re jealous. We wish we had a gas grill. We also wish we had won the PowerBall. We wish a lot of things.

It’s all moot because, not only are gas grills illegal on the island of Manhattan…but even if you did manage to sneak one up the freight elevator while no one was looking, transporting propane through any of the tunnels is also a big NYC no-no. Sure, you might have shared outdoor space in your building and you could charcoal it up, but, let’s face it, that all sounds a bit messy. And, carting a 40lb bag of charcoal from Food Emporium to your apartment is next to impossible. Plus – you’ll be damned if you’re going to get one of those roll-y carts.

No fear, my dears – We can do lots of grillish meals in the comforts of our tiny kitchens. And this wine-can chicken may actually change your mind about always relying on the rotisserie option.

Wine Can Chicken (Serves 4)

Tiny Apartment Tips:

  • Ideally you might have a deepish roasting pan to sit the chicken in…but if you only have a lasagna or even a baking dish, use those. Just line with Reynold’s Wrap to ease clean up
  • OK, you have to have fresh Thyme on this one…But remember, you can freeze the unused Thyme and use it in future dishes for up to 6 months. Just put the thyme in a ZipLoc baggie and throw it in the fridge. I might wash it first too.
  • Remove all but the lowest oven rack before heating the oven…I put mine on top of my cabinets when not in use. You can hide it behind a door or something…
  • Invite someone who likes dark meat – I don’t…

Ingredients:

chicken roasted wine infused can

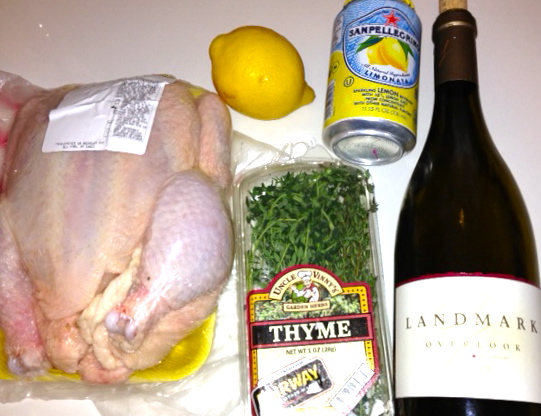
Always Mise En Place – partial MEP…forgot to photo the garlic and Jane’s Krazy stuff

  • 1 Whole Chicken (3.5 – 4lbs) bought mine at Fairway who had the best price that day
  • 3 Cloves Garlic Smashed
  • 2 Lemons – juiced
  • The zest of 1 Lemon
  • 5 Sprigs of Thyme plus the leaves from 2 add’l Sprigs
  • 6 Oz Good-ish White Wine – whatever you have leftover. Consult @grapefriend.com for suggestions if you like. I used a chardonnay left over by my white wino friends
  • 1 TBSP Jane’s Krazy Mixed Up Lemon Pepper
  • 2 TBSP Olive Oil
  • 1 empty 12oz Can, rinsed and cleaned inside and out – I used a lemon San Pelligrino can thinking that any left over flavor in the can from the lemon would be AOK

Preheat the Oven to 400 degrees F

1. In a small bowl whisk together the Olive Oil, Jane’s Krazy Mixed Up Lemon Pepper and the leaves from 2 Sprigs of Thyme

2. Into a Cup Measurer with oz – Pour 6oz of Chardonnay

3. Into the Chardonnay add the juice of 1 lemon PLUS the zest of 1 lemon

4. Whisk together wine and lemon

5. Pour the wine and lemon mix into the empty San Pelligrino can

6. Into the can shove the smashed cloves of garlic

7. Add the 5 sprigs of Thyme into the Pelligrino Can

wine can chicken in oven

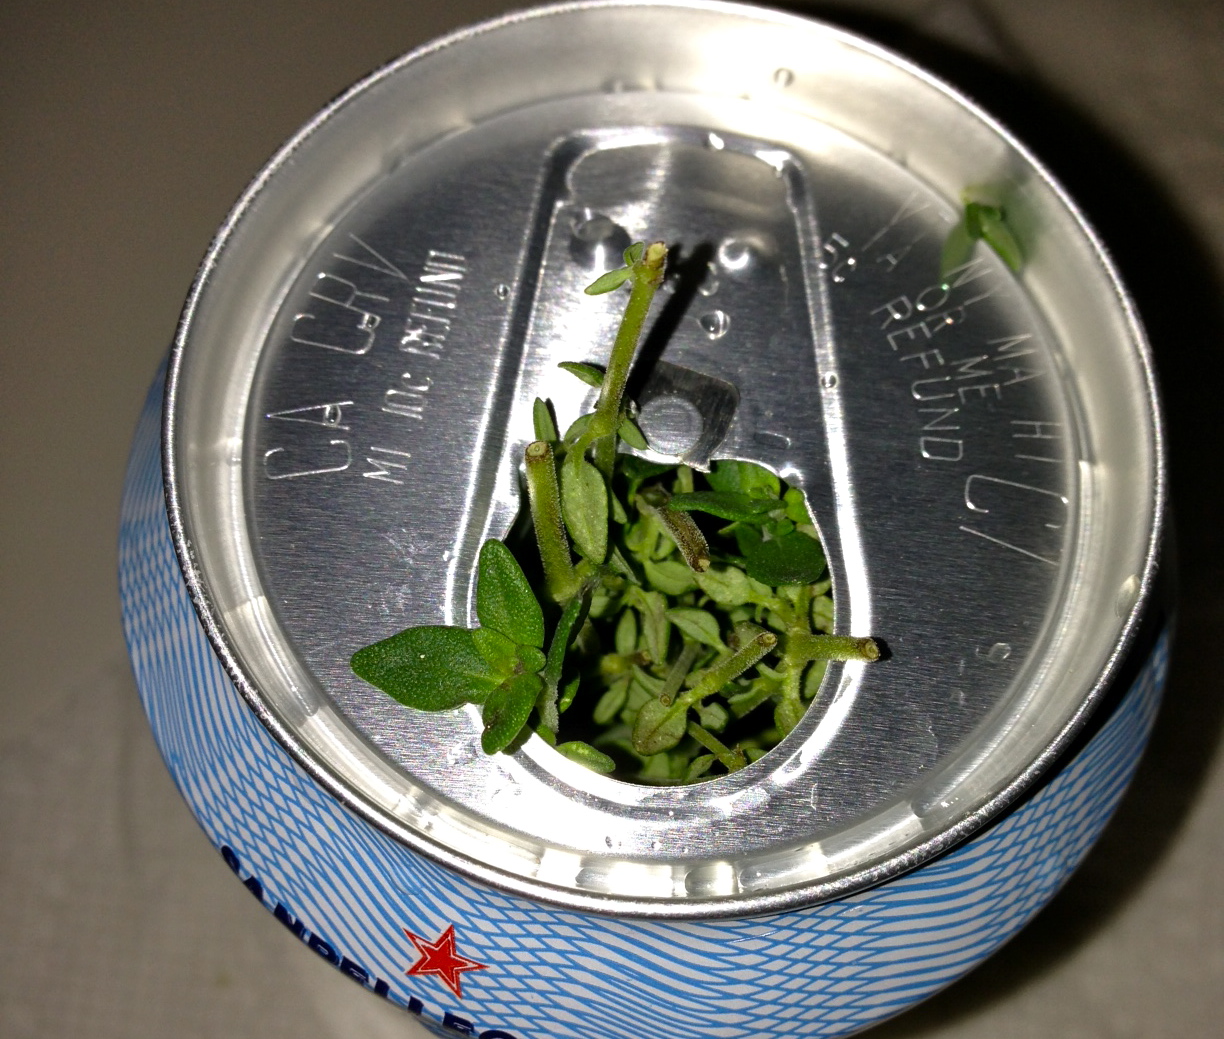
Doesn’t have to look perfect – I removed the tab from the can, but not sure you have to

8. Give the can a little swirl

9. Unwrap the Chicken and rub the front and back with the Olive Oil, Lemon, Thyme Leaves, Krazy Mixed Up Lemon Pepper

wine can whole roasted chicken in oven

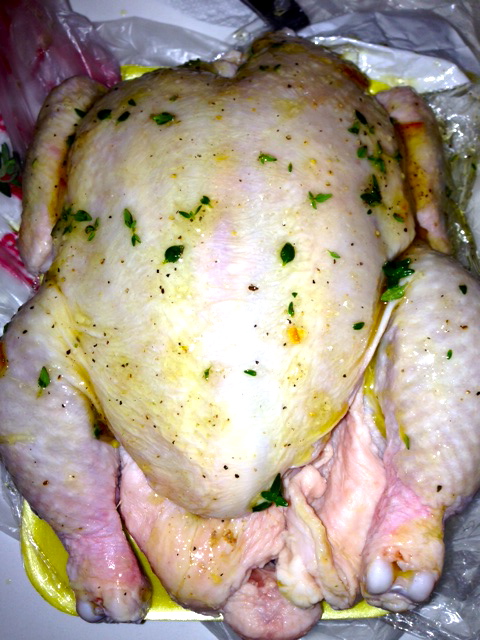
Rubbed with flavorful goodness

10. Sit the Wine-Filled San Pelligrino can on the center of the lined lasagna/baking/roasting pan and then sit the whole chicken atop the can – inserting the can into the Chicken’s ‘cavity’

roasted whole chicken in oven herb infused

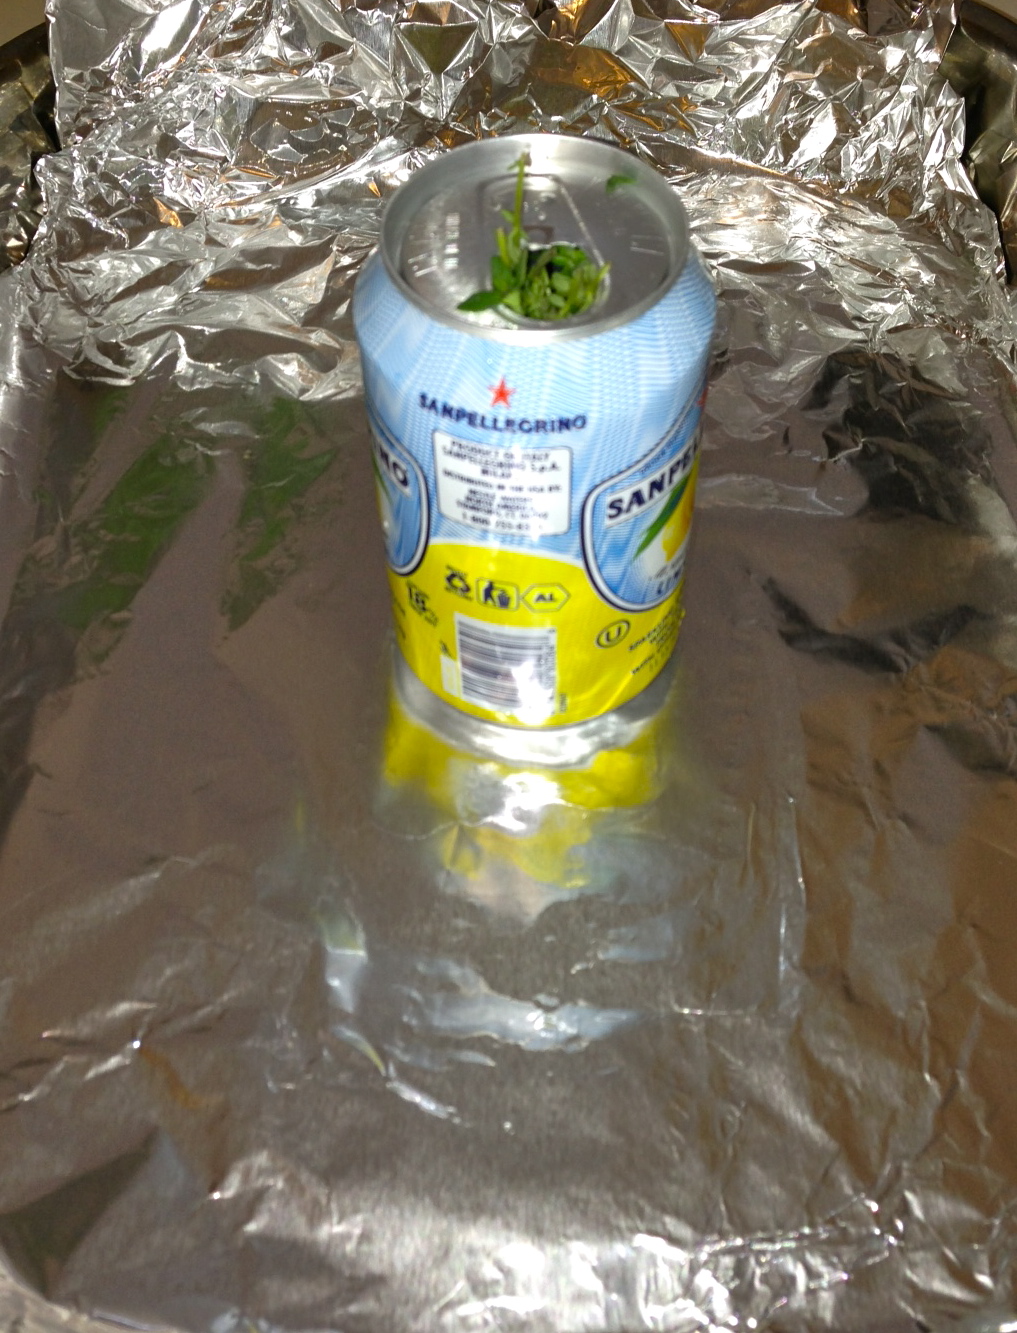
Can on pan…I used a lasagna pan

wine can beer can chicken roasted in oven

Violate the Chicken with the Wine-y, Herb-y Can

11. Put into the oven – and roast for 1 hour – turning the pan 180 degrees about halfway through to ensure even cooking

12. Check with a meat thermometer beginning at :45 mins. Breast area should read 170 degrees and Thighs should read at 180 degrees when done

13. Take out of the oven and let sit for :10mins before moving chicken off of the can and onto a cutting board

wine can chicken herb infused recipe food

Perfectly Roasted Wine-Can Chicken – Next time I might take the Chicken off of the can and lay flat for the last :15 of roasting to even the browning on the skin. Next time

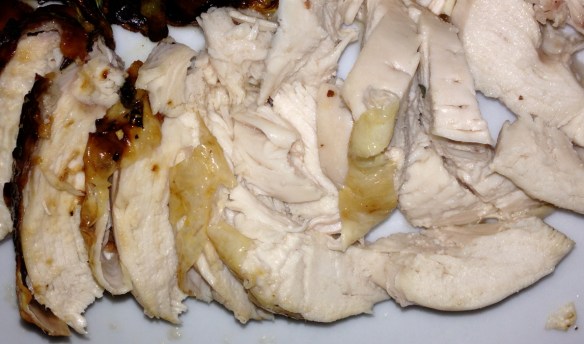
14. Slice and serve!

wine can chicken oven recipe dinner food

Served mine with pan crisped yellow zucchini

Yes, people make beer-can chicken on their outdoor grills all the time. But, beer is so gauche.

The wine-can chicken technique seriously may have changed my mind about defaulting to the store roasted bird. It was amazingly good and so very easy.

So this weekend when all of those suburbanites are busily posting pix of their outdoor grilling bonanzas, you just rest comfortably in your tiny kitchen with your perfectly roasted wine and herb infused whole chicken. Put that in your bird and roast it!

Advertisement

If At First You Don’t Succeed: Pie Pie Again

grey goose pie crust

Vodka Infused Pie Crust

Perhaps the only thing uglier than my handwriting, is my pie crust. So, don’t expect a lot of pictures in this one…

I watch a good number of cooking programs and am always in awe of the ease with which Ina or Giada or Melissa D’Arabian rolls out a perfect pie crust. ‘How Easy Is That?’ Ina always says as she places the perfect crust into the pie pan. Each of them assured me that making my own pie crust would be a much better option than buying a store bought one in my grocer’s freezer.

Challenge really is that I don’t like pie. I’m not a baker. I’m not a sweets eater or much of a fruit eater. I do, however, enjoy a good pie crust – it’s like bread, my favorite food group. During the holidays, I’m the person who picks around the apples in the apple pie and dips pieces of crust into the gooey filling. I’m the person who sneaks into the kitchen and pulls a piece of the crust off of a cooling pie.

But, I’m up for the challenge. And, so I spent some time researching the perfect pie crust recipes.

This is a combination of a few recipes that I found online. And, it really wasn’t hard…until I had to roll it out and carefully place it into my makeshift pie pan – this is where I had to Pie Pie again.

Perfect Pie Crust (makes 2 crusts – theoretically for the top and bottom of a pie…or, in my case, one for the bottom of an open-faced pie, one for ‘practice’)

Ingredients:

  • Grey Goose Vodka infused pie crust

    Yay! Vodka!

    2 1/2 Cups Gold Medal All-Purpose Flour

  • 1/4 TSP salt
  • 2 TBSP Sugar
  • 12 TBSPs Cold Butter – cut into 1/4 inch slices
  • 1/2 Cup Cold Vegetable Shortening – cut into 4-6 pieces
  • 1/4 Cup Cold Vodka (Yay! Vodka! I don’t drink it anymore – that’s another story –  and it evaporates – so this is AOK for all)
  • 1/2 Cup cold water
vodka infused pie crust

Butter Makes it Better

1. Take the butter and cut it into 1/4 inch slices. Cover and put into the freezer for :10mins or into the fridge for :30 mins

2. Measure out the food shortening (I used Crisco…is there another kind?). And place into the freezer for :10mins or the fridge for :30 mins

3. In the bowl of a food processor, Pulse 1 1/2 cups of the flour, the salt and all of the sugar until combined – about two quick pulses

vodka infused pie crust

I heart my Cuisinart

4. Add the butter and shortening and process until a dough begins to form and cottage cheese looking curds appear

vodka infused pie crust

Food Shortening Kinda Grosses Me Out

5. Scrape down the bowl and add the remaining flour – pulse just until the mass of dough has been broken up

6. Empty the mixture into a bowl

7. Sprinkle the water and the vodka – I used Grey Goose, cuz that’s what someone recently brought over

vodka infused pie crust

Pie Crust Gets Drunk

8. Use a spatula to carefully fold the water and vodka into the dough until both are completely absorbed. Don’t over mix!

vodka infused pie crust

Carefully fold in the booze and water

9. It’ll be super tacky…Divide the drunken dough in two, make two balls of dough, flatten each and wrap each in plastic

10. Put the flattened balls of drunken dough into the fridge for at least an hour and up to 2 days

Baking the Pie Crust for an open faced savory pie:

Here’s where my creative abilities were truly challenged…and, I lost.

OK, I don’t like sweet pie, so decided to make an open-faced veggie filled pie for my vegetarian friends who came to dinner last night. Luckily, that meant I only needed one of the pie balls. Good news, because I failed the first time I tried the following:

Pre-heat oven to 425 degrees (that part I did perfectly!)

1. Remove one of the drunken pie balls (sounds dirty, isn’t) from the fridge and allow to warm up for a few minutes – not too long, just until the dough can be safely rolled out

2. Place one ball on a large piece of Saran wrap dusted generously with flour

grey goose infused pie crust

Still Hopeful At this Point

3. Place a large piece of parchment paper on top of the pie dough

4. Roll the pie dough through the parchment paper into a circle large enough to line the pie pan. I don’t have a pie pan…and really don’t need one…so I improvised with my round glass baking dish.

5. Try to carefully place the rolled dough into the makeshift pie pan. FAIL horribly. Mold that dough back into a ball, cover in Saran Wrap and put back in the fridge

6. Pie Pie again….Remove ball #2 from the fridge and repeat steps 1 – 4: This time, carefully roll the rolled out dough onto a heavily floured rolling pin and unfurl the dough from the rolling pin gently into the makeshift baking dish – much better

7. Cover the baking dish (or pie pan) with plastic wrap and refrigerate for at least an hour

Shop online, clean the apartment…whatever

8. Remove from the fridge, cover the dough completely with parchment paper

Ceramic pie weights

I bought pie weights!

9. Place pie weights into the base of the pie dough and ‘blind bake’ for :20 minutes. You can apparently also use dried beans as pie weights…but, I don’t have a giant bag of dried beans (small apartment, remember?)

9. After :20 minutes in the oven, remove the pie weights and parchment paper, pierce the bottom of the pie crust with a fork – like a whole bunch of times to keep the pie crust from puffing – and bake for another :05 – :10 minutes until the crust is a light golden brown

reynold's wrap drunken pie crust

Not Pretty, But Delicious!

10. In the second baking, I foil wrapped the edges of the pie crust to keep them from burning

And….your drunken crust is prepared for filling!

I gotta say, the pie crust was delicious – light, flaky, no vodka taste. It provided the perfect vessel for an open-faced veggie pie. (recipe tomorrow)

Of course it wasn’t as easy as Ina had assured me. But, thank goodness for a do-over…Cuz, in this case, after a first fail, I had to Pie Pie again…

The Other Kind of Spicy: Spicy French Onion Soup

Gindo's Hot Pepper Sauce French Onion Soup Melissa D'Arabian recipe dinner appetizer

A Twist of Spice: Spicy French Onion Soup

The other day I read an article or – ok, let’s be honest – saw something on TV – about how quickly the spice can fade out of a relationship. One very important authority – ok, it was Dr. Oz (but if it’s good enough for Oprah, it’s good enough for me) estimated that the spice is gone within three years. He went on to say that the only way to stay in a relationship is to continue to spice things up.

Dr Oz

Dr. Oz Knows Stuff

Something to think about. But, since this isn’t ‘that kind’ of blog – we’ll leave that type of spicing up and talk about the benefits of eating spices instead.

And, luckily, Dr. Oz talks food spices and herbs as well. Cayenne pepper, for example, can boost your metabolism and help you lose weight more quickly. Ginger and mustard have a similar effect.

french onion soup with thyme

Thyme

There are also herbs and spices that as per the good Doc, can help you combat aging and fight against disease and make you smarter.

One of my favorite and not too crazy of herbs, Thyme, can help you fend off MRSA and is used in mouthwash to help treat throat inflammations and in cough drops to fend off throat infections.

I’m not a huge fan of the super spicy – again, we’re talking edible spices, this is a food/food stories blog after all. I mean, I have been accused of being sassy and maybe even a little bit saucy…but no one has every called my cooking too spicy. I try to include spices and flavors that will please all my reader(s). Like, even though I don’t love garlic (and neither does Ina, btw), I will include almost the entire directed amount prescribed by a given recipe…Ok, to be honest, I usually sub out 1/2 the garlic and replace it with a sweet shallot. I’m trying.

But, it’s time…and I’ve decided to step out of my comfort zone and try to spice things up a bit.

And, as per Dr. Oz, I may be getting thinner AND healthier at the same time!

Spicy French Onion Soup (serves 2-4)

  • Gindo's Spice of Life pepper sauce

    Metabolism Speeders

    1 TBSP Butter

  • 2 Medium Sweet Onions sliced thin with the grain – so you have onion strips. I had to stare at the onion for like a long time to figure this out…
  • Salt and Pepper
  • 1 TSP Flour
  • 1/3 C of Red Wine
  • 1 TSP Fresh Thyme
  • 1 TBSP fresh Lemon Juice – really good add by Melissa D’Arabian who recommended just a teaspoon. So good an idea that I added more!
  • 1 Bay Leaf
  • 1/2 TSP Gindo’s Red Pepper Sauce
  • 1 1/4 C Beef Stock – I use Kitchen Basics because it comes in the smaller sizes and I didn’t need a 33oz box
  • 1 1/2 C Chicken Stock
  • 1/2 C Grated Swiss Cheese – if you’re feeling fancy, get gruyere…but it’s pricey and the Kraft shredded swiss is also good
  • 1 – 2 TBSP Grated Parmesan Cheese
  • 1 Baguette Slice for each bowl of soup. Sliced about 1/2 inch thick and lightly toasted. I buy the petite baguettes at Food Emporium…But, really, you could just toast up any hearty bread you might have on hand…

1. In a large saucepan – I used my 4qt All-Clad soup pot with the copper core – because I love it – melt the butter over med/low heat

2. Stir in the onions, add salt and pepper and cover

Onions in butter!

Onions in butter!

3. WAIT – like forever – though get in there and stir them around every :15 mins or so

4. After about :90 mins, the onions should be a lovely brown and caramelized. If they’re not…send a tweet to Melissa D’Arabian and ask her for tips to speeding the process. She will tweet you back ‘Time :-)’. So, I gave it more time.

twitter melissa d'arabian

Thanks, Melissa D’Arabian!

5. Once the onions are caramelized, turn up the heat to medium and stir in the flour….cook for about a minute or so.

melissa d'arabian spicy french onion soup

Caramelized and Floured

6. Add in the wine to deglaze the pan. Use a wooden spoon to scrape all of the oniony-goodness from the bottom of the pan

7. Add in the thyme, lemon, a bay leaf….And, this is where I got all spicy…the Gindo’s Fresh and Spicy Pepper Sauce – I used the red one, but either the green or red will do here.

8. Add both the beef stock AND the chicken stock, stir and bring to a boil, reduce to a simmer (BTB/RTS)

spicy french onion soup

BTB/RTS

9. Simmer for :10 mins

10. Ladle the soup into 2 – 4 sassy french onion soup bowls….Or, in my case, an oversized ramekin. (note, if you are thinking of Christmas gifts for me and want to try this soup..well, you know)

11. Top the soup with a single slice of the toasted baguette

12. Top each baguette with a heap of the swiss cheese and a sprinkle of the parmesan cheese

spicy french onion soup

I like cheese…

13. Put the soup bowls on a rimmed baking sheet and into the oven on Full BROIL

14. Broil just until the cheese is cheesy – bubbly and beginning to brown

Serve while piping hot…and spicy!

I’m not a big fan of the spicy foods. And, people who douse their meals in hot sauce have always baffled me…I mean, how can they really taste what’s going on when it’s overpowered by hotness?

But, it’s good to step out of your comfort zone once and maybe more than once in a while and spice things up a bit. And, listen, if it’s making me thinner AND fighting off a sore throat…I’m like totally in and willing to give the other type of spice a try.

In It to Win(e) It: Post-PowerBall Packets of Fish

Lo-Cal Dinner

For those who are wondering…I didn’t win the half a billion dollar PowerBall lottery last night. This really blows my retirement plan and is sort of ruining my Thursday morning. I think in order to win, you have to live in a place like Missouri or, even, apparently, Arizona. And, no, I’m not even one of the two $1million winners in New York State. Very disappointing.

Sad Losing Ticket – with two worthless matching numbers

So, I’m still – like so many – watching my pennies. Trying to use every ounce of everything in the kitchen…Staying on top of expiration dates in the cupboard and fridge…

When people come for dinner or drinks  at my apartment they are charged with bringing white wine. I don’t drink white wine. Ever. Like as TSwift might say: never ever ever. Even in the summer. Even at a ladies luncheon. OK, once I drank white when I was at a holiday party at the apartment of a friend who – due to her entirely white interior decorating scheme – served only white wine. But, I didn’t enjoy it.

People Just leave Wine!

So, in the rare instance that there is left over white wine in my apartment, I try to cook with it. Left over wine is an unusual occasion – you should meet my friends.

This morning I found a half drunk bottle of Lapostolle Sauvignon Blanc in the fridge. I thought about drinking away my sorrows from the PowerBall loss…but, let’s face it…It wasn’t even noon and that would just be too sad.

I also found some capers and lemons in the fridge…thyme in the freezer and, of course, frozen Whole Foods Tilapia. I’m a little obsessed with always having it on hand.

And, I’m still on my quest to lose the Sandy 15lbs.

So I made:

Tilapia En Papillote (serves 2)

OK…first and foremost, if you are using frozen fish, take it out of the freezer, remove it from the packaging, place in a baking dish, cover with Saran Wrap and store in the fridge at least 7 hours before you want to cook it.

Ill-Advised Defrosting

Now – honestly, I’ve forgotten to do this and you can just leave the frozen fish in a covered baking dish on the kitchen counter…but, for whatever reason, you’re not supposed to do it that way. Whatevs, I lived.

Preheat oven to 375 degrees

1. Place one Tilapia Filet in the center of a 10ish inch x 10ish inch piece of either heavy duty tin foil, or as I did on that fancy Reynold’s Wrap Pan Lining Paper: Parchment on one side, tin foil on the other. It’s like the mullet of cooking papers (business in the front, party in the back)

Fancy!

2. Sprinkle the filet with Thyme or Lemon Thyme

Thyme Sprinkles on the fish on the Parchment side of the pan lining paper

3. Layer on some capers – I love capers, they’re like salty goodness – just thought you should know

Capers On…Lemons Staged

4. Sprinkle with salt – and pepper, if you want

5. Cover the filet with lemon slices

6. Place one pat of butter on top of the lemon slices

Give ’em all a little pat of butter

7. Spoon about a TBSP of white wine over the fish – be careful, you don’t want the wine to (eeks!) spill outside of the parchment paper and be wasted!

8. Fold up the sides of the fancy Reynold’s Parchment/Tin Foil (mullet) wrap around the fish. Make sure there is space between the fish and the wrapping as you want the fish to have room to steam. And, be sure that the packet is completely sealed.

NOTE: if you see the pros do this – they create a perfect half moon shaped packet… I’m just not that artistically skilled or creative. And, you can get the same effect with any shaped packet.

No Points for Style

9. Repeat with three other filets

10. Put the pretty (or not so pretty) packets on a rimmed baking tray into the oven and bake for :12-:14 minutes depending upon thickness of fish

11. Carefully remove the fish from the packets, plate and serve

Pretty Pescatarian Plate

So, with my losing PowerBall ticket I won’t be dining at Perse or jetting off in my private plane to St. Bart’s. Nope. I’ll be hoping that I can continue to count on my white wino friends to leave just a few tablespoons of wine in my fridge to dress up a meal…or two. And, I’ll continue to buy PowerBall and MegaMillions tickets…Cuz, you gotta be in it to win it!

Improvisations: No Rolling Pin? No Problem.

Paula Deen Beef Wellington's

Thank you Paula Deen!

A Chorus Line

Best. Musical. Ever.

When I was young, A Chorus Line was my favorite play. After school my best friend and I would stand proudly on the ledge of her large bay window and belt out songs from the show for our audience – her parents. Imagine her very catholic father’s surprise as we belted the lyrics to ‘Tits and Ass’ out of our 12-year old mouths.

In seventh grade, I auditioned for the school play with the character Morales’ song ‘Nothing’. In the song, Morales is learning how to do improvisations ala: ‘now you’re on a bobsled, it’s snowing out and it’s cold…OK Go!

I never hesitated about the words and delighted the director as I sang ‘I felt nothing except the feeling that this bull shit was absurd!

I got a small part and the shock of my peers.

This past weekend I learned even more about improvising.  I was upstate at a friend’s home. We were hosting a dinner party for 12 – in part because another good friend was visiting from San Francisco (please don’t call it ‘Frisco’) and also so that our group could meet the host’s new boyfriend.

At the host’s request, I agreed to make Paula Deen’s Individual Beef Wellingtons in a Sherry Cream Sauce. Even though I’ve made the wellies a dozen times or so, I’ve had to improvise each time for one reason or another.

  • I couldn’t find the right pastry
  • The supermarket had no baby bella mushrooms
  • I was cooking for 4 not 12
  • This oven is too hot or not hot enough

This past weekend presented yet another improv challenge – ‘You’re making wellingtons, you have to roll out pastry dough, you don’t have a rolling pin. OK Go!

Individual Beef Wellingtons in a Sherry Cream Sauce (serves 12)

Note…After making this so many times, I think with the sequence of steps below, I’ve finally found the best way to ensure that dinner is deliciously delivered to the table on time.

Ingredients for the wellies, sauce ingredients to follow:

  • 12     1 1/2 inch thick beef tenderloin fillets
  • 2 tsps salt
  • 1 tsp ground pepper
  • 4 tbsp butter – it’s Paula Deen after all
  • 2      8 oz packages of baby bella mushrooms minced – Improvisation: I bought 2 10oz pkgs of pre-sliced shrooms at Trader Joe’s – $1.99 each! Math isn’t my thing and I just used most of the mushrooms, not all.
  • 1 large shallot minced – Improvisation: I used 2 smaller ones
  • 1/3 cup dry sherry
  • 1/4 cup heavy cream – again, it’s Paula Deen just go with it
  • 2 tbsp chopped fresh parsley
  • Dufour Puff PastryThe recipe calls for 2 packages of 17.3oz frozen puff pastry (aka: Pepperidge Farm) But..Improvisation: I used 4 packages of Dufour Puff Pastry Dough – they carry this at Whole Foods and it’s worth every penny of the $11.99 per package.
  • 2 large eggs lightly beaten – I needed 3

Here are a few things you need to know before you start:

  • minced baby bella mushrooms

    Shrooms & Shallots Mise En Place

    There’s some chopping – mincing of the shallots, mushrooms and chopping of the parsley take time – prepare ahead

  • The meat needs to chill for at least an hour after you sear it – don’t start cooking at 5pm for a 7:30 dinner. Actually, I usually sear the meat and make the filling the night before
  • The puff pastry is frozen – you will need to either thaw by putting in the fridge the night before, or you can take it out :40mins to an hour before you need it, unwrap it and thaw it on the kitchen counter
  • The sauce takes about :40 minutes – you can make the sauce while the meat is chilling and just reheat it when you’re ready to serve.

1. Sprinkle the fillets on both sides with 1 tsp of salt and 1 tsp of pepper. In a large skillet, melt all 4 tbsp of butter over med/high heat

butter

mmmmm….butter

2. Add the fillets (probably in batches as I’m guessing you might not have a skillet large enough for all 12 at once) and sear on both sides – about 1 1/2 mins each side

Searing the Meat – One side done

3. Put the seared meat on a tray, cover and chill for at least an hour in the fridge

CREATING THE Wellington filling…AKA The YUMMY GOODNESS

4. In the same pan, in the meat juices, add the mushrooms and shallots and cook over med/high heat for 3 minutes stirring occasionally

Baby Bella Mushrooms

Shrooms & Shallots

5. Add the sherry, cream, parsley and 1 tsp of salt. Cook, stirring frequently until all the liquid is absorbed – this takes about 12 – 14 mins

baby bella mushrooms Trader Joe's

The Yummy Goodness

baby bella mushrooms trader joe's beef wellington filling

Yummy Goodness Complete

6. Put the yummy goodness in a bowl, cover and refrigerate

————————————————————————

Use the chilling time to: Make the Sherry Cream Sauce

Ingredients:

  • 3 tbsp butter
  • 4 cloves of garlic minced
  • 1/4 cup of flour
  • 2 cups of beef broth
  • 1/2 cup of dry sherry
  • 1 cup heavy cream

Sauce 1. In a medium skillet over medium heat, melt the butter….Add the garlic and saute 3 minutes

Sherry cream sauce

Saute The Garlic

Sauce 2. Add the flour and cook, stirring constantly for 2 more minutes to cook out the floury taste

creating a roux

Creating the Roux

Sauce 3. Whisk in the broth and sherry…BTB / RTS (bring to boil, reduce to simmer) and simmer for :10 mins

Adding the beef broth

Beef Broth & Sherry & Boil

Sauce 4. Whisk in the cream and simmer another :20 mins. The sauce is very thick even without the cream…so, you can skip the cream or add a lot less – but, at this point, you’ve already soaked the meat in butter, so why not add the cream?

heavy whipping cream

Just add the cream

Sauce 5: Transfer the sauce to a small sauce pan and cover to keep warm

————————————————————————

Back to the Wellie Assembly

Preheat the oven to 425 degrees and line two rimmed baking sheets with parchment paper

7. Roll out 1 puff pastry sheet to about 12x10inches and cut in half

NOTE: if you don’t have a rolling pin – Improvise…We used a washed and floured Diet Coke can – Oh! The irony!

Diet coke can

Rolling Pin

8. In the center of each half pastry sheet, place a heap of the yummy goodness and gently press down to about 1/4 inch thickness

baby bella mushrooms beef wellington filling

A Heap of Yummy Goodness

9. Place a seared fillet on top of each heap of yummy goodness

10. Paint the edges of the pastry with the beaten egg

paula deen dufour's puff pastry

Painted Edges

11. Pull up the corners of the pastry over the meat and seal with additional beaten egg

12. Flip the meat package over and place on the rimmed baking sheet

13. Repeat until all 12 fillets are wrapped

14. Brush each package with the beaten egg

15. With the left over puff pastry, cut out seasonal shapes and place onto the wellies. Since it wasn’t yet Thanksgiving and certainly not Christmas, we decorated with fall leaves and acorn shapes.

16. Give the decorated wellies one more brush of the egg wash and place in the oven

beef wellingtons

Stuffed, Sealed, Decorated & Oven Ready

17. Bake for :20 -:22 minutes until the pastry is golden brown.  When you remove from the oven, let the wellies rest for at least :08 mins. The meat should be a perfect medium rare

18. Each guest will have his/her own perfect package with a generous pour of sherry cream sauce

individual beef wellingtons

Perfect Package

Life is full of opportunities to improvise. The trick is not to be thrown by them.

Generally, I don’t share meal prep improvisations with my guests. I mean, no one had an allergy, so did they need to know that we used real flour not corn starch to flour the pans in which we prepared a meant to be gluten-free cake? And, when you think about it, improvising with the diet coke can as a rolling pin for a fabulously fattening Paula Deen dish is not only ironic, but may be just a little bit brilliant…